Renishaw - Setup the UCCserver Client Tool Environment

Please ensure your UCC controller and UCC Suite version support Client Tool Environment.
See UCC Direct 2.0 (DCC) - Controller / UCC Suite versions for compatibility.
For legacy UCC Direct users upgrading to UCC Direct 2.0
Make a note the current Machine Configuration File
- Launch CMM-Manager and go the System Tab > Machine Setup (Password = service) and write down the Machine Configuration Filename for later use.
For all users installing or upgrading to UCC Direct 2.0

UCC Server must be launched using the -advanced parameter in order to make the following changes:
- Right click on the UCC Server shortcut icon on Windows Desktop and select "Properties" from the popup menu
- Under Shortcut tab on the Properties dialog, append -advanced to the Target executable path, e.g.
- "C:\Program Files (x86)\Renishaw\UCC\UCCSERVER\UCCSERVER_55000\UCCSERVER.exe" -advanced
- Click OK to accept the change.
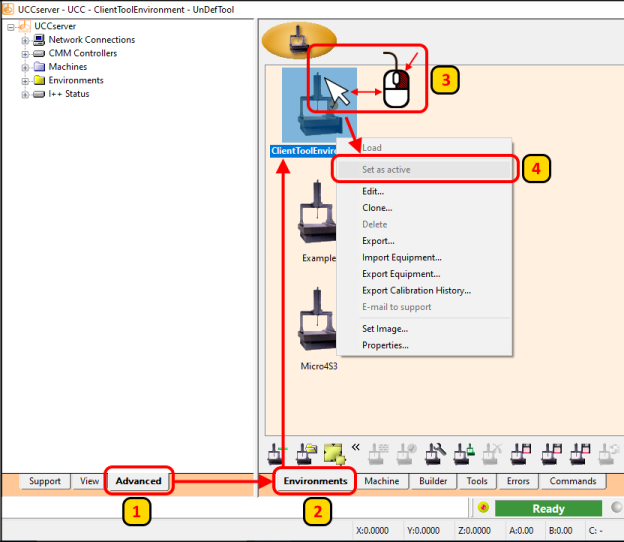
Set the ClientToolEnvironment Active
WARNING : If the ClientToolEnvironment does not exist,STOPSee the instructions at the end of this page
- Click the Advanced Tab
- Click the Environments Tab
- Use the mouse to position the cursor on the ClientToolEnvironment icon and right click
- Select Set Active from the pop up menu
- Reboot UCC Server
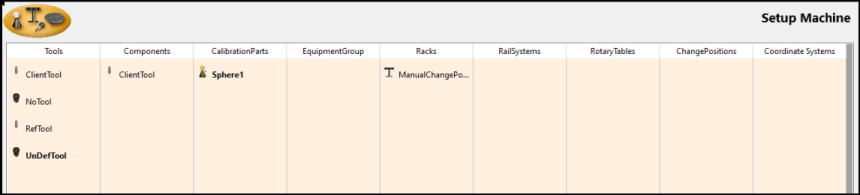
Verify the ClientToolEnvironment Configuration
- Click the Advanced Tab
- Click the Machine Tab

- Verify the contents of the ClientToolEnvironement
- There should not be any missing items
- There should not be any extra items
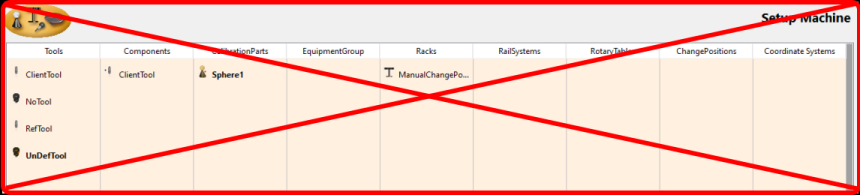
- This environment must remain unmodified by the user
- Do Not: Add any items here
- Do Not: Delete any items here
- Do Not: Edit or otherwise modify any items here
- Do Not: Create a Ref_Tool and cal sphere and calibrate
- Do Not: Create or configure a rack here
Configure the ClientToolEnvironment
- Click the Advanced Tab
- Expand the Machine tree and right click on the ClientToolEnvironment Machine
- Click Edit
- Browse to, and select the machine .ini file (Micro4S3 in this example
- Select the proper probe type
5a. For a PHC10 embedded in the controller, or an external PHC10-2/3 connected to the controller, select the actual head type.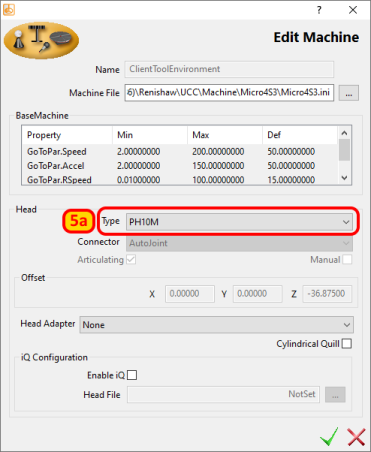 5b. For an external PCH10-2/3 connected to the PC, or a manual head, select Other.If you are getting an error about probe type not matching what is on the machine when trying to connect to UCC after migrating from the UCC legacy driver, check the ProbeHeadType setting in the UCC machine .ini file to make sure it is set correctly.
- It should be set to 2 if the PH10 or PHC10-2/3 is connected to the UCC controller
- It should be set to 0 if the PH10 or PHC10-2/3 is connected to the PC or it is a manual probe head.
Refer to this KB article for detailed description: Renishaw - UCC Direct 2.0 (DCC) - Hardware Diagrams.
- Click the green checkmark to accept your configuration
Verify parameters (Only required when upgrading from Legacy Direct Connect)
When upgrading from a legacy version of Direct Connect to Direct Connect 2.0, it is recommended you review and update the acceleration parameters in UCC Server.
Complete the Setup
Continue with 'Setup/Upgrade CMM-Manager' Here
Restoring/Repairing the ClientToolEnvironment

If further assistance is required beyond what is shown here, please contact QxSoft at support@qxcmm.com or call 740-777-9609
Restoring the ClientToolEnvironment
If the ClientToolEnvironment is missing, there are a few option available to restore the missing environment:
- Exit UCC Server, then run the UCC Suite Install Manager. It should detect a 'broken' installation. Tell the UCC Install Manager to 'repair' the installation. Run UCC Server and verify that the environment has been restored.
- Export a known clean ClientToolEnvironment from another system. Import that ClientToolEnvironment into the system where this environment is missing.
- Contact QxSoft for instructions for where to obtain a clean ClientToolEnvironment.mzp file. This file can then be imported into the system where this environment is missing.
Importing a clean set of tools into ClientToolEnvironment
Download the ClientToolEnvironment_TransferEquipment_ClientTool.tzp file in the attachments section below. Import this file into the Environments section of UCC Server.